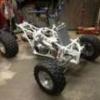
domestic_beotch Posted January 6, 2012 Report Share Posted January 6, 2012 So trickedcarbine had to mention this frame mod that another member did and I instantly knew I had to do one. So we went down to Komisar motorsports and got me a doner frame to start cutting up. Sweet deal, $130 for a OEM REPLACEMEMT frame. We looked at the geometry of several frames and tried to think of the easiest way to modify the frame with only the current steel structure provided on the frame. This meant we had to cut the parts off the nose in a way that would allow us to reuse each part, however with different placement for a little bit better geometry. The key aspect of the build was to show that not only is it possible to change the stocker, (that has been done already)but that it can be done with minimal tools, fab skills, and material, wich all adds up to a fairly easy DIY modification. Obviously everyone and their brother would love an outlaw, protrax, or even a frame like evan(358banshee) is building. No tubing benders, notchers, or high dollar tools other then the welder(sorry). But with a decent mig(tig prefered) and a cut off wheel you can do this in a garage. Ill start with the stock pics and go from there. Here is after cutting it apart After cutting the center sections out and grinding a lot! Pieced back together Quote Link to comment Share on other sites More sharing options...
domestic_beotch Posted January 6, 2012 Author Report Share Posted January 6, 2012 Re attaching and steering stem mount After looking at it for a while, adding the front bars back on Modding the Full flight arms Mocked up to make shock mounts Quote Link to comment Share on other sites More sharing options...
domestic_beotch Posted January 6, 2012 Author Report Share Posted January 6, 2012 I know everyone doesnt have a Outdoor sand blaster but I do so I blasted it. Did some other welds and a couple gussets. Cut and extended a stock steering stem so it would reach the lower bearing location and be 2" taller Front plastic mounts re attached. All un needed brackets were also removed. Coil mount was moved too as I planned on moving the radiator behind the steering stem but it wasnt really fitting. More pics this weekend. Its in powder coat right now. Please no PM's just reply to the post and I'm not looking to do this to everyones frame:( sry but I don't have tons of time with a full time job. Its low because it will be set up for ice and I'll need some long shocks in the spring. Quote Link to comment Share on other sites More sharing options...
guns4children Posted January 6, 2012 Report Share Posted January 6, 2012 yummmm........ molson Quote Link to comment Share on other sites More sharing options...
domestic_beotch Posted January 6, 2012 Author Report Share Posted January 6, 2012 (edited) it looks a little weak where the base of the frame connects to the a-arm part also have you check the a-arm motion yet? There is a plate that runs on the bottom of the rebuilt section tieing in to the un-modified section. There is also a pair of gussets on each side. kinda boxes in the whole section. Checked the A-Arm motion? Really? Yeah they goes uppedy down diddy real niicee! Seriously though, the ball joint motion is the same if not better then the full flight set up. They are decent arms, but they really needed sorting. Again this was supposed to do a easy low complicated build. Not a re engineering project. Hence the modification of the A Arms I already had. The only issue may be getting the bump steer sorted by tweaking stem height to correct the motion of tie rods. Also wanna mention that the heim joints will eventually with extreme angle ball joints once spring comes and the bike is on long travel shocks. Edited January 6, 2012 by domestic_beotch Quote Link to comment Share on other sites More sharing options...
#1JUANstunna Posted January 6, 2012 Report Share Posted January 6, 2012 I'd like to see a closer pic of the lower frame where it was welded back to the original frame. Top, bottom, and side shots. That looks a little scary to me. How did you reattach the top rails? Did you slide another piece of pipe on the inside and plug weld it? Just wondering Quote Link to comment Share on other sites More sharing options...
Judge1 Posted January 6, 2012 Report Share Posted January 6, 2012 I hope your health insurance is up to date. Quote Link to comment Share on other sites More sharing options...
LaegerEliminator Posted January 6, 2012 Report Share Posted January 6, 2012 Looks good. Lots of progress. Glad to see after all of that grinding and welding that you finally covered the truck and the bike. Great way to pit your windshields, maybe paint too. Quote Link to comment Share on other sites More sharing options...
domestic_beotch Posted January 6, 2012 Author Report Share Posted January 6, 2012 I'd like to see a closer pic of the lower frame where it was welded back to the original frame. Top, bottom, and side shots. That looks a little scary to me. How did you reattach the top rails? Did you slide another piece of pipe on the inside and plug weld it? Just wondering Ok I'll get a few pics of that when the frame is back from powder. The tubes are just but welded. There are 7 mounting points in the front right there. I think it will be ok. But that could be an idea for the next guy to do it. Quote Link to comment Share on other sites More sharing options...
domestic_beotch Posted January 6, 2012 Author Report Share Posted January 6, 2012 I hope your health insurance is up to date. Don't get yur comment? But yeah I have awesom insurance and I already had cancer so I think I'll be fine. The garage also has great ventilation. Quote Link to comment Share on other sites More sharing options...
domestic_beotch Posted January 6, 2012 Author Report Share Posted January 6, 2012 Looks good. Lots of progress. Glad to see after all of that grinding and welding that you finally covered the truck and the bike. Great way to pit your windshields, maybe paint too. Thanks. All the grinding was done outside and the bike and my truck were not in the garage when any welding was done. I spent $2500.00 on paint materials for the truck. I'm not going to F it up like that. Quote Link to comment Share on other sites More sharing options...
zach45 Posted January 6, 2012 Report Share Posted January 6, 2012 Awesome DIY. Can't wait to hear how she handles... Quote Link to comment Share on other sites More sharing options...
domestic_beotch Posted January 6, 2012 Author Report Share Posted January 6, 2012 Awesome DIY. Can't wait to hear how she handles... Thanks Zach! And Mr Molson. Nice to get a little positive feedback after trying to help people out with info. Quote Link to comment Share on other sites More sharing options...
06specialedition Posted January 6, 2012 Report Share Posted January 6, 2012 Can't wait to see it all finished! Quote Link to comment Share on other sites More sharing options...
domestic_beotch Posted January 6, 2012 Author Report Share Posted January 6, 2012 Don't get yur comment? But yeah I have awesom insurance and I already had cancer so I think I'll be fine. The garage also has great ventilation. Maybe your saying it's going to break and I'll get F'd up. Maybe an idea on how to make it better???? Quote Link to comment Share on other sites More sharing options...


Recommended Posts
Join the conversation
You can post now and register later. If you have an account, sign in now to post with your account.